In the latest SYNTH ANATOMY video tutorial, I give you an overview how you can use hardware Synthesizers, guitars… with iOS effects applications!
Everybody knows the situation! If you want to get new sounds out of your hardware Synthesizer you take a look on the impressive guitar pedal market. Especially delay and reverb pedals are often taken by musicians to make the sound bigger. What many do not know, in their trouser pocket they have an effect processor device with which you can realize this even cheaper and more versatile. It’s an iOS device: iPhone’s iPad or an iPod Touch.
On the iOS market, there are currently very good-sounding effects that can be combined very well with hardware. So known plugin manufacturers have also released their plugins as an iOS app: Audio Damage, Sugar Bytes … But also many iOS developers have exciting effects on offer for little money: apeSoft, Ruismaker, Elastic FX and many more.
Why Not Android?
Android devices are not excluded because I don’t like them but just because of technical reasons: they have many audio latencies that makes problems working proper with music tech apps. The iOS system is based on the CoreAudio drivers which are optimised for such tasks. Beside this, the market of Android effect apps is super small and not interesting at the moment.
If this is clear, let’s start!
Which Devices Do I Need?
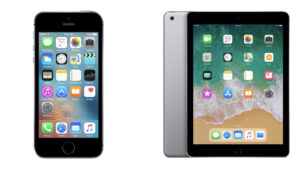
One thing is for sure: you do not need to run immediately to the nearest Apple Store and buy a new iPhone or iPad. Many old devices that often have musicians lying around after their 2 years contract (iPhone 6/7 ) can still be used for this task. Especially if you limit your setup to one or two apps at the same time. I would recommend to use only devices which are 64bit ready because many iOS apps supports only these systems. I can recommend the following iOS devices:
- iPhone 6, 6S, 7, 8, X, SE
- iPad 3, 4, Pro, Pro 2, 2017, 2018, mini 4
- iPod Touch 6
If some older ones are not there, this is because the CPU and RAM shading is too small in my opinion for some apps.
How To Make The Lightning Port Compatible With Music Tech Products?
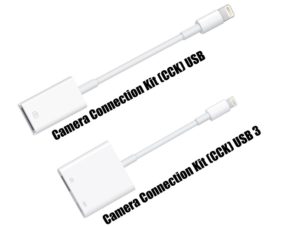
I recommend highly the second one because it gives you the possibility to charge your iPad/iPhone at the same time. Also please don’t buy a CCK from a third-party companies or clones from China because most of them doesn’t work or have problems. There are also already products from the music tech field which provide a lightning connection. They do not need adapter.
Which Audio Interface Is Compatible With iOS?
Also in 2018, there is no guarantee that audio interfaces are automatically compatible with iOS devices. An important point to watch out for is that it is Class Compliant. That means that the device does not need drivers to work. If your AI works without drivers on macOS, it will work pretty sure on iOS. You can say that because both are based on the CoreAudio drivers.

I can not name all the audio interfaces in this article, but for some I know they work for sure. But you have to be careful if the AI needs an optional power supply or not because the iPad/iPhone here often do not deliver enough. Here are some audio interfaces which are compatible with iOS: Apogee Jam 96K, Arturia AudioFuse, Focusrite iTrack Dock, Scarlett series, iConnectivity iConnectAudio 2+/4+, Steinberg UR series, Zoom U-44,…
If you found an audio interface that works with iOS and the synths are connected comes the next question:
How Can I Pick Up The Signal Now?
The iOS environment is not much different than the PC or Mac. There are also two possibilities: either the iOS apps are standalone or they need a host. If they are standalone, you can select the input source inside the app. Using the app in the host brings two big advantages: if it’s an AUv3 app, you can use it several times, secondly you can combine several apps at the same time and adjust the routing according to your wishes.
If you want to the complete package, then you opted for an iOS DAW such as: Auria Pro, Cubasis 2, Beatmaker 3…. You want it simple and plan to work mainly with audio, I can recommend AudioBus 3 or AUM from Kymatica. The latter is powerful audio mixer where you can easily add channels and add instruments and effects to it.

The Recording Process
Last but no least, you can then record directly your sounds in the host, DAW or route the audio to the interface outputs.
To conclude this tutorial, here are some links to apps that are important in my opinion to this topic.

Be the first to comment